1.svg)
 CALL US FOR FREE QUOTE


 Blog
Blog About us
 1.svg) Contact
Contact.svg) Bookings
Bookings Cleaning address
 Requisites (for business)
 1.svg) Contact details
Contact details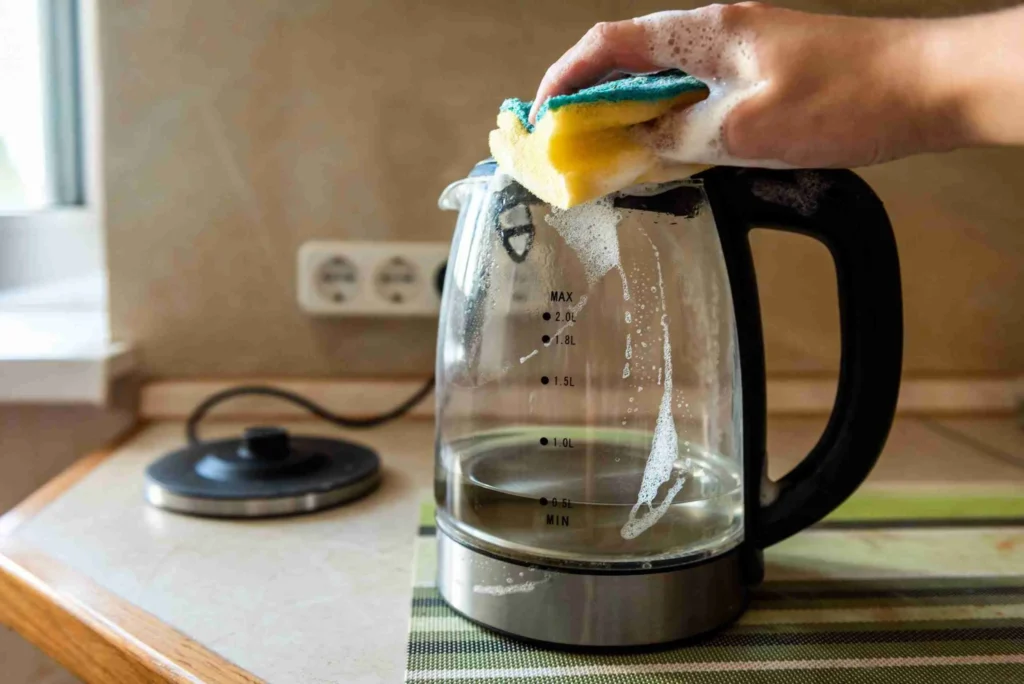
How to Clean an Electric Kettle
Electric kettles are an essential kitchen appliance, especially for tea and coffee lovers. However, like any appliance, they require regular cleaning to maintain efficiency and ensure your water is safe from limescale buildup and other impurities. In this guide, we will explore different methods to clean your electric kettle effectively, both inside and out.
1. Why Clean Your Electric Kettle?
Over time, electric kettles can develop a buildup of limescale, especially if you live in an area with hard water. Limescale can not only affect the taste of your water but also impact the kettle’s efficiency, potentially shortening its lifespan. Regular cleaning helps to:
- Prevent limescale buildup.
- Ensure better energy efficiency.
- Keep your kettle hygienic and extend its lifespan.
2. How to Clean the Inside of an Electric Kettle
Materials Needed:
- White vinegar or lemon juice
- Baking soda (optional)
- Water
- Soft cloth or sponge
Method 1: Using White Vinegar
White vinegar is an effective, natural way to clean your kettle and remove limescale buildup.
- Prepare the Mixture: Fill the kettle with a solution of equal parts water and white vinegar. For example, if your kettle holds 1 liter of water, use 500 ml of water and 500 ml of vinegar.
- Boil the Solution: Turn on the kettle and allow the water-vinegar solution to come to a full boil. Once boiled, let it sit for about 15-20 minutes to loosen any buildup.
- Rinse Thoroughly: After the solution has cooled, pour it out and rinse the kettle thoroughly with cold water several times to remove the vinegar taste and smell.
- Boil Fresh Water: Fill the kettle with fresh water and bring it to a boil to ensure no vinegar residue remains. Discard the water afterward.
Method 2: Using Lemon Juice
If you prefer a more pleasant smell, lemon juice is a great alternative to vinegar for cleaning your kettle.
- Mix Lemon and Water: Add the juice of 1-2 lemons to the kettle, along with enough water to fill it halfway.
- Boil and Let Sit: Bring the lemon water to a boil, then let it sit for 15-20 minutes to help dissolve limescale.
- Rinse: Pour out the lemon water and rinse the kettle with cold water. You can boil fresh water once more to remove any lingering lemon taste or smell.
Method 3: Using Baking Soda
Baking soda can also be used to help clean your kettle, especially for stubborn stains or odors.
- Mix Baking Soda and Water: Add 1-2 teaspoons of baking soda to the kettle and fill it with water.
- Boil and Soak: Boil the solution, then let it sit for 15 minutes.
- Rinse Well: Pour out the solution and rinse thoroughly with cold water. You can boil plain water once more to ensure all residue is gone.
3. How to Clean the Exterior of the Kettle
The exterior of the kettle can get dirty from fingerprints, water splashes, and spills. Here’s how to clean it effectively:
Materials Needed:
- Damp cloth or sponge
- Mild dish soap
- Baking soda (for tough stains)
Step-by-Step Process:
- Unplug the Kettle: Always unplug the kettle before cleaning the outside to ensure safety.
- Wipe with a Damp Cloth: Use a soft, damp cloth or sponge with a small amount of dish soap to wipe down the exterior of the kettle.
- Baking Soda for Tough Stains: For stubborn spots, create a paste with baking soda and water, and gently scrub the affected area with a soft cloth. Avoid using abrasive cleaners, as they can scratch the surface.
- Dry the Kettle: Use a dry cloth to wipe down the kettle and ensure no moisture is left behind.
4. How Often Should You Clean an Electric Kettle?
The frequency of cleaning your electric kettle depends on how often you use it and the hardness of your water. As a general rule:
- Light Cleaning: Clean the kettle every 1-2 weeks if you use it daily. Wiping the exterior and giving the inside a quick rinse can help maintain it.
- Deep Cleaning: Perform a deep cleaning with vinegar, lemon juice, or baking soda once a month, or more frequently if you live in an area with hard water.
5. Tips to Prevent Limescale Buildup
- Use Filtered Water: Using filtered or bottled water instead of tap water can help reduce the amount of limescale buildup, as it contains fewer minerals.
- Empty After Each Use: Pour out any leftover water from the kettle after each use to prevent standing water from leaving mineral deposits.
- Regular Maintenance: Clean your kettle regularly to prevent limescale from hardening and becoming more difficult to remove.
Conclusion
Cleaning your electric kettle is an essential part of kitchen maintenance. By using simple household ingredients like white vinegar, lemon juice, or baking soda, you can effectively remove limescale and other impurities. Regular cleaning will not only improve the efficiency and lifespan of your kettle but also ensure that the water you boil is clean and safe to use.
Takeaway Tips
- Use white vinegar or lemon juice for natural limescale removal.
- Always rinse the kettle thoroughly after cleaning to avoid lingering smells.
- Clean the exterior with a mild dish soap solution to keep it looking spotless.
- Deep clean the kettle at least once a month, especially if you live in a hard water area.